[SOLVED] Windows 8.1 black screen with cursor bug – black screen of death
Ah, Windows 8.1. Its been a bit of a hassle lately with issues of screen blinking and black screen of death. A lot of our clients have experienced this issue which disables their computers and displays the cursor in front of a black screen. Understandably people have got frustrated and stressed about losing their files. In this post we will explain the possible ways this bug is tripped and how you can repair it.
Why this issue occurs:
The information is limited, but most clients have explained that the computer finished an update and restarted. The Windows 8.1 Black Screen bug then presented itself on reboot, locking them out of their computer and their files. Other users claim that no update was applied, they just restarted their computers and the black screen problem appeared. Just like the flickering screen issue, we believe this issue to occur due to a driver or program conflict during startup. This can be caused either by an update or by possible failure of the hardware or software. Due to the random nature of the bug we can’t advise with absolute certainty what causes it. But, we can show you how to fix it.
How to fix the problem:
Ok, “the solution”. It’s not a straight forward fix. We have seen computers continue to fail after the repair; and some start to work as normal with no loss of files or programs. We will show you what steps to take sequentially with the final option of refreshing your computer if all else fails. We know refreshing your computer will lose your programs, but your files, pictures and documents are. In this guide we show you 3 ways to solve the Windows 8.1 black screen with cursor bug:
- Changing your startup settings and repairing the faulty drivers.
- Performing a system restore to wind back changes to your system since update
- Refresh your computer.
How to put Windows 8.1 into recovery mode:
To begin, we need to put the computer into recovery mode. This can be quite difficult if you don’t have access to the operating system but it is possible. First of all if you’re working on a laptop, check the manufacturer’s website for instructions. Most laptops have a recovery partition stored on their hard drives and you can usually access this by pressing one of the F-Keys on your keyboard as the system boots up. Try F11 as this is the most common, however it does change per manufacturer so if it didn’t work for you, check your manual or the web. This method will also work with most modern desktop PC’s built from the large manufacturers.
If that didn’t work and you have a Windows 8.1 DVD lying around, pop it in and boot from the DVD. When the DVD loads you will be given an option to repair your computer from the main menu, select this and you will be placed into recovery mode.
If all else fails, the last resort is to force your computer to automatically diagnose boot issues. This a last effort attempt as we don’t recommend intentionally crashing your system on startup. However, for some this may be the only option. The method is simple. As the computer is booting, hold down the power button on your computer till the computer turns off (force shutdown). Then turn the computer on again and repeat until you see a message saying “diagnosing your PC”. After this prompt you will be placed into recovery mode.
Solution 1: Changing your startup settings and repairing the faulty drivers
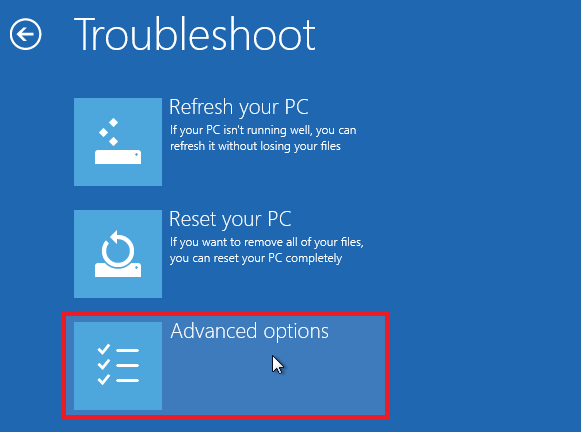
Step 1: Once in recovery mode, select “troubleshoot”

Step 2: Select “advanced options”
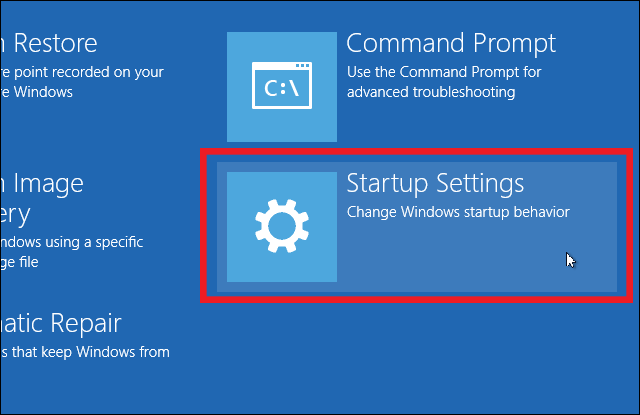
Step 3: Select “startup settings”
Step 4: Once at the startup options screen press F4 to place your computer into safe mode
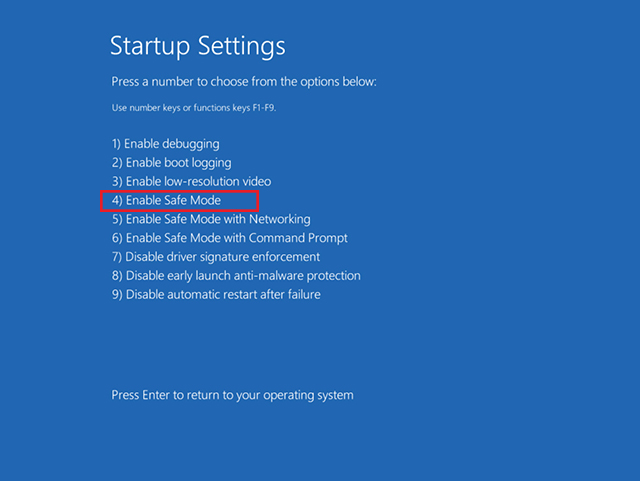
Once in safe mode go to control panel -> system -> device manager and open display devices. Then uninstall any video cards that are listed and restart the system. When the computer starts windows it will re-install the graphics cards drivers. From this point we recommend updating your video drivers from the manufacturer’s website; and restarting your computer again to complete the installation.
Solution 2: Perform a system restore to wind back changes to your system.
Follow the steps to get into recovery mode again. Then once in recovery mode..
Step 1: Select “troubleshoot”
Step 2: Select “advanced options”
Step 3: Select “System Restore”

Once you start the system restore select the date before the last crash happened. if you can’t see a date old enough, click on the check box to see older restores. Select the most appropriate restore point and complete the restore process. The computer will restart and login to windows normally. This repair may take some time, so stay calm if it looks paused. It’s doing the work in the background.
Solution 3: Refresh you computer to reset all settings
If all else fails then a system refresh should resolve your problem. When performing a system refresh 3rd party programs will be removed (Microsoft Office, MYOB, Skype etc). However, your files, documents, pictures and other personal data will stay on the PC. Warning: DO NOT PRESS SYSTEM RESET – if you do, your personal files will be deleted.
With that said, lets continue on and refresh your pc. As mentioned earlier, use the same steps to get into recovery mode. Then…
Step 1: Select “Troubleshoot”
Step 2: Select “advanced options”
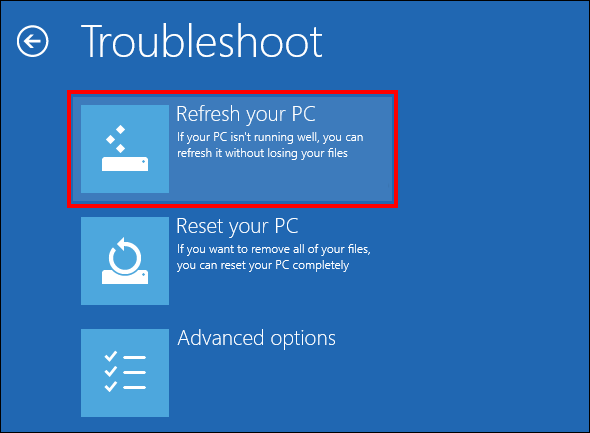
Step 3: Select “refresh your PC”
When you press refresh your PC, you will be prompted with information about the refresh. You may also be prompted for an administrator password to continue. Once the refresh is completed you will be returned to your desktop as it was before the bug. This process will also take some time to complete.
Conclusion
That’s it, If you followed the steps your system will be restored back to operation. As a precaution, if you do succeed in logging back into your system go to the Microsoft Support website and download their update to prevent your system from crashing again. Follow the link bellow to download the update:
http://www.microsoft.com/en-us/search/DownloadResults.aspx?q=KB2756872
If the above steps didn’t resolve your issue, you may have a more serious bug and may need a full re-install of the system. If you haven’t backed up your system then you may need to organise a onsite technician to back up your data and reinstall. Good luck, if you have any questions please do not hesitate to leave us a message or chat with us with the chat system provided.